Introduction
Text
Toolbox
addresses some text features that missing from Adobe Illustrator or that help
you integrate Adobe Illustrator in a workflow that uses several products
including Adobe Illustrator and that require editing of flowable text.
Text
Recovery
A
common problem when importing files into Illustrator is that all text has been
converted to 'point' text. This means, that paragraphs no longer flow when
modifications need to be made. One can say that this is one of the biggest
problems when importing files from one application into another.
Text
Recovery does
not change the fact that text is converted to point text on import, but it
gives you the ability to restore paragraphs from a collection of point text
items. During restoration, the tool lets you compare the old collection of
point text objects versus the new 'text in a box' object, so that you can
fine-tune the restored text before deleting the old point text.
This
simple work-flow tool gives you the best of both worlds: you can keep all the
text as-is if you do not need to edit the text, and as such, not introducing
any errors, and only restore to flowable text when needed, and as such
recreating flowable text so that complete paragraphs can be edited.
Tab
Leader
Making
ingredient labels in Adobe Illustrator is a tedious task since Adobe
Illustrator does offer the functionality of adding tab leaders in your text.
Therefore, a designer has to revert to inserting all those points (when using
points as tab leader) until the gap is properly filled etc.
Using Tab
Leader will reduce
the complexity of this task. With one simple command, you can insert all the
tab leaders you need to properly format your ingredient list.
Also,
since these tab leaders will not update automatically, the plug-in offers
utility functions that enable you to still edit the text after the tab leaders
are inserted.
Installation and requirements
The Text Toolbox requires Adobe Illustrator version 8, 9 or
X. On the Macintosh, Mac OS 8.6 or higher is required.
To install on
Macintosh, Adobe Illustrator 8 or 9
To install Text
Toolbox, copy the Adobe
Illustrator TextRecovery
and Tab Leader plug-ins
you find in the Adobe Illustrator 8 & 9 folder to the 'plug-ins' folder in the Adobe
Illustrator application folder.
To install on
Macintosh, Adobe Illustrator X
To install Text
Toolbox, copy the Adobe
Illustrator TextRecovery
and Tab Leader plug-ins
you find in the Adobe Illustrator X folder to the 'plug-ins' folder in the Adobe
Illustrator application folder.
This installation
in Adobe Illustrator adds
-
a floating
palette 'Tab Leader'
-
and 7
functions in the ‘Text Toolbox’ menu in the ‘filter’
menu:
-
Add Filler
String
-
Remove Filler
String
-
Remove Spaces
before Tabs
-
Text Recovery
-
Remove New
Lines
-
Compress
Repeated Spaces
-
Replace Repeated
Spaces By Tabs
The next time you
launch Adobe Illustrator, a license dialog will pop-up to enter the license key
that will enable the full functionality of the toolbox. No functionality will
be enabled when no valid license is entered.
On Macintosh the
licenses are not shared
between Mac OS 9.x and Mac OS X applications, but the licenses are the same.
This means for example that you will have to enter your license twice if you
run Adobe Illustrator X both under Mac OS 9.x and Mac OS X: once upon the first
launch in Mac OS 9.x, and once upon the first launch in Mac OS X.
Operation: Text Recovery
Restoring a flowable text object
Select all the (point) text that you want to convert to a text in a box. The selection you make cannot contain other text-in-a-box objects or text-on-a-path objects. Any other object type that is not point-text is ignored.
Now select text Recovery from the Text Toolbox item in the filter menu.
If the selection contained unsupported text objects, or nothing at all, a warning dialog will be displayed, and nothing is done.
Otherwise the text objects are converted into a single text in a box item, containing all selected text. The converted object contains all the original text in the correct style, size etc. Character and word spacing is retained as much as possible. The paragraph is also restore to be right aligned or fully justified.
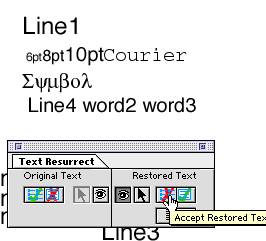
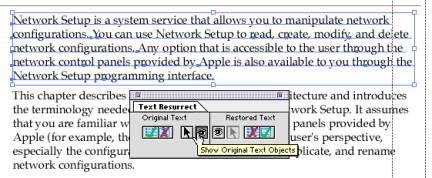
The next thing you will see as an operator is that both the original text and the new text object are displayed in the artwork, and a floating palette is opened.
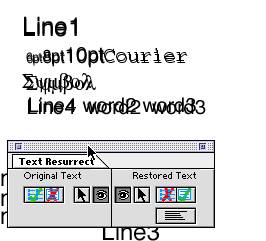
This palette contains a 'left half' for the original text and a 'right half' for the restored text. The 'eye' buttons let you control the visibility of the original and the restored text. Toggling the visibility allows you to compare both the original text and the restored text.

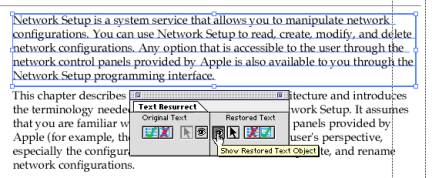
Here you only see the original text, while
here you only see the restored text.
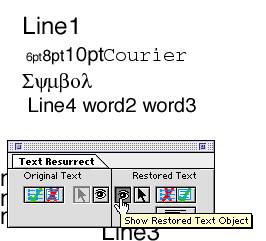
You are allowed to change the content of the restored text at this time. For this purpose we also provide an easy selection function that: in most cases you will select both the restored and one or more of the original text objects when selecting with the standard tools since both the original and the restored text object overlap. For example, to move the restored object, select it by clicking the arrow button at the right hand side:
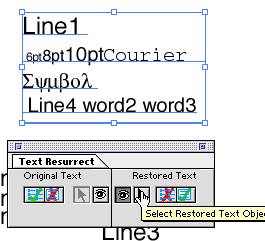
Now, you can move the text object by using the cursor keys.
TIP: a small misalignment is very common after restoration. This can be fixed in a few simple steps: click the ‘select Restored Text Objects’ button while both objects are still visible (immediately after invoking the Text Recovery function). Now use the arrow keys to move the restore text object until the top left character of the original and restored text match up.
As soon as decided which version to keep, do the following: click on the Reject Restored Text Object button in the right half of the dialog to keep the original text items and delete the restored text item, or click on the Accept Restored Text Object button in the left half of the dialog to delete the original text items and to keep the restored text.
Clicking one of these two buttons will close the dialog since the restoration operation is now completed.
Some more info about the eye and select buttons:
By default, the eye buttons will toggle the visibility of both the original and the restored text. This means that in most cases only one of both (with the exception of the original view) will be visible. However, if you click on the eye buttons while holding down the 'option' key, you will only toggle the visibility of either the restored text or either the original text. This allows you to again view both at the same time.
The select buttons also have 2 modes: the standard mode will first clear the current selection, and will then select the specified objects. However, holding down the shift key while clicking the button, will add the specified objects to the current selection.
It will even work for super and sub script
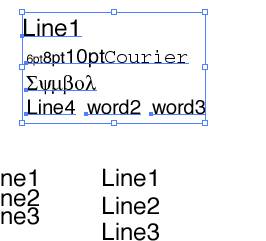
The next example will illustrate that Text Recovery will also restore sub and super script text objects.
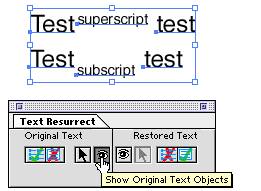
This example shows that the original text has 2 lines of text, where the first line contains super script, while the second line contains sub script.
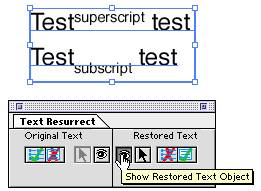
After restoration we indeed get 2 text lines, where the superscript and subscript text is correctly placed on the baseline where it belongs to.
Controlling the text alignment
Text Recovery also detects the alignment of the restored text: it detects left aligned, centre aligned, right aligned and justified text. This detection is fully automatic, but in some cases you might prefer that Text Recovery restores all text simply as left aligned. You can do this the following way:
After restoring the text, the Text Recovery palette will open. The button at the bottom of the palette controls the alignment detection:
When this option is not selected (default), the alignment will be detected, but if this option is selected, the alignment will not be detected and will be set to flush left.
Note: when switching between these modes, the complete text box will be regenerated. Therefore, any changes you already made to the restored text box will be lost.
The setting of this option is saved between recoveries, so the next time you restore a text box, it will start in the same mode as you selected when accepted/rejected the last text box.
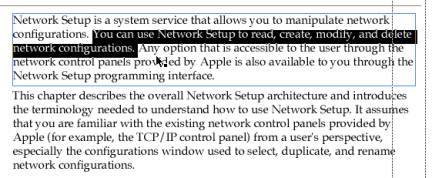
Example: removing a line from a paragraph
In this example, we want to remove a complete line from a paragraph.
As can be seen, the paragraph is broken into several chunks. Removing the sentence ‘You can use Network …’ at this point would be very cumbersome to do.
After restoration, the objects become one text block again, and then removing the line is very simple:
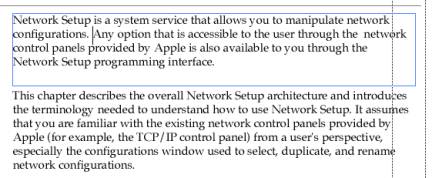
As you can see, the effort to edit complete paragraphs is now reduced to a minimum, giving you the freedom to change and correct everything you need.
Operation: Tab Leader
General way of working
The operation of the Tab Leader plug-in is controlled in the Tab Leader floating palette:
The section above the separator line determines what the actual used filler string will be and what settings it will use, the section below the separator line triggers the actual actions.
First the operator needs to define the filler string to use when adding tab leader. In the above example, a repeat of one or more periods will be added when executing the tab leader command.
The filler string can be any sequence of characters, up to 15 characters.
Note that for Tab Leader there is a difference between entering a single character and entering the same character more than once: Tab Leader will only insert a multiple times that string you entered. So, if you enter a single character, the added string can be one character, or two characters, or three characters, etc. However, if you enter 2 characters, the added strings will be at least 2 characters, or 4 characters, etc.
The second fill in fields allows to add some additional space between the filler characters. For example, a period is a nice filler character, but the spacing of periods is actually to tight to give a nice filler string.
The 2 buttons to the right control what font settings will be used when adding the filler string: either the font settings from the text where the filler string will be added are used for the filler string too (the left button), either the ‘current’ font settings from the character palette are used for the filler string.
Once all these settings are set-up, we can start to add our filler strings. How do we do this:
Select a text box, or a piece of text. Then click on the ‘green plus’ button, and the Tab Leader plug-in will add filler strings at all appropriate places. To remove those strings again, use the ‘red cross’ button.
Note: it is important to understand that the Tab Leader plug-in does not ‘simply’ remove the strings that were added previously. The plug-in actually searches for the filler string at specific locations, and if some of these strings are found, they are removed. This means that removing the filler strings might fail if the current filler string does not match with the filler string used on the sections that you want to clean.
Selections:
The Tab Leader plug-in works on 3 kinds of selections:
- either you select a range of characters,
- either you select one or more text boxes,
- either you don’t select anything at all, which is the equivalent of selecting all text objects.
All functions of the Tab Leader plug-in are limited in scope to the current (text) selection as described above.
A simple example
In this first example we have a block of text that is arranged in three columns, and where we want to add a ‘dot’ filler string.
We don’t that to do anything special here: we simple add the ‘dot’ as the filler string, and we set the leading to 200 to add some additional spacing between the dots.
After setting the params, we click the ‘add’ button, and we get the result below.
You can see that in all the free space in the columns, the filler string is added as many times as possible.
The following enlargement also illustrates some points:
- first, you will see that all filler strings are properly aligned. This is, each filler character on all lines is perfectly aligned.
- You can now also see the difference between the dots that do not have the additional spacing (these were part of the original text) and the dots of the filler string that do have additional spacing.
Example using columns
The following example explains when the ‘columns’ options becomes useful.
In the following example, we want to add filler strings between the items and their prices. However, a first tab is also used to left align the items.
If we would simply add the filler strings everywhere, we will get the result below:

This is not really what we want: the first column should not get a filler string at all. So, what we need to do is select that we only want filler strings in the second column: To do this, we do the following:
First we remove the fillers we just added using the ‘red cross’ button.
Then we set the fill-in field in between the buttons to the number of the column we actually want to change. In our example it is the second column, so we enter 2.
Now we add the filler strings again, and we get the result below:
Operation: Auxiliary functions
Auxiliary functions
The Text Toolbox plug-ins also provides auxiliary functions:
- Remove New Lines will remove all new lines from the text selection, or from all the selected text objects.
- Compress Repeated Spaces will replace all sequences of more than 1 space by a single space, and this in the text selection of from all selected text objects.
- Replace Repeated Spaces By Tabs will replace all sequences of more than 1 space by a tab, and this in the text selection of from all selected text objects.
- Add Filler String and Remove Filler String are the same functions as found in the Tab Leader palette: Add Filler String will add the current filler string to the current selection. Remove Filler String will remove (the current) filler strings from the current selection
- Remove Spaces Before Tabs will search the current selection for spaces that can be found immediately before tabs in the text stream.
When can there functions be useful…
Example: Remove New Lines
This function is useful during the
comparing step of the text restore: Text Recovery will insert multiple spaces to reach a certain alignment, and will
insert new lines to select a new line when appropriate. However you might manually
change these paragraph settings, and in such cases, these multiple spaces and
new lines can interfere with the flow of the restored text.
For example: you do not want to keep the
new lines inserted by Text Recovery when you
change the alignment from align left to adjusted, to get a re-flow: you need to
remove all new lines. Doing this by hand can take some time, and this is where
the Remove New Lines comes to your assistance.
Example: Compress Repeated Spaces
This functions is useful during the
comparing step of the text restore:Text Recovery
will even insert multiple spaces if Text Recovery selected to set the alignment of (a part of) the restored text to
justified. You might want to check what the text block looks like when you
remove all multiple spaces.
Example: Replace Repeated Spaces By Tabs
This functions is useful during the comparing step of the text restore: When you are restoring a text box that contains columns of data…
First you let Text Recovery restore the text box. However, this restored text will only contain repeated spaces, never tabs. However, if you know they should be tabs, you can replace them easily: select the section of the restored text that should be columns separated by tabs, and apply Replace Repeated Spaces By Tabs. The result will be that most of your columns will be restored automatically, saving you another big piece of time consuming repetitive work
Example: Remove Spaces Before Tabs
This functions is useful when using Tab Leader. Tab Leader will never remove any characters when inserting filler strings. However, spaces before tabs can lead to unexpected results sometimes, since you might wonder why filler strings are not added at some locations. This might be because the text before the tab actually ends by one or more spaces that you do not see, but that prevent Tab Leader to add the filler string since there is no space enough to add one ore more filler strings. Removing these spaces up-front using this function removes